Surrey University's Combyne Lab gave a BioDynaMo tutorial during the (COST Action) NETSKINMODELS' training school
On July 10-12, 2023 at the University of Surrey (Guildford, England, UK), the COST action CA21108 European Network for Skin Engineering and Modeling (NETSKINMODELS) held its Training School 2023 Advancing skills in 3D skin and epidermal biology computer modelling (intended for PhD students and post-doc level researchers with at least preliminary programming skills and an excellent command in digital literacy).
The COMBYNE Lab was there. Roman Bauer, Umar Abubacar, and Cayla Harris offered an introductory tutorial about BioDynaMo and the advantages that adopting a standardized and optimized general purpose agent based simulation suite can produce for the reproducibility and reusability of models and research.
Following you can find the slides and transcript of a portion of the tutorial, kindly shared by COMBYNE Lab's PhD student and BioDynaMo contributor Cayla Harris. We hope you find it interesting and useful (and don't hesitate to get in touch with us!!!).
Introduction:
The BioDynaMo Collaboration is open-source, multifaceted project with an aim to approach health and biological research from a new technological angle using agent-based simulations of cellular models. We believe personalised and digital medicine will play a large role in the future of medical research, and because we believe this vision is highly interdisciplinary, we want to make BioDynaMo usable for individuals from a broad range of research backgrounds, including those new to computational methods. Therefore, we have crafted a “virtual image” with BioDynaMo already installed to allow research with an interest to try out the basics of BioDynaMo without any installation!
Why are we using a virtual machine?
- We will take for granted that you know what an operating system is
- If you wonder why we prefer linux (Ubuntu) check this intro for example
- There are many tutorials on how to use command line in Ubuntu
- For this introductory seminar we relied on running Ubuntu in a virtual machine:
- Taking our windows-based machine and using a virtual machine is simple, you just have to know which one you want to use (VMware, Virtualbox, Hyper-V)
- The advantage of using a VM for this exercise is that it allows us to use Ubuntu and all the applications we need to run BioDynaMo without any installation processes, we simply just summon the Ubuntu environment we have created and distributed earlier, you can download the image we used here
Instructions for opening up the virtual machine:
Pre-requisites: you should have VMWare Workstation Player installed (for free). From: https://www.vmware.com/uk/products/workstation-player/workstation-player-evaluation.html
- Downlod the folder “ovffile” available from (insert link to the google drive that has the folder)
- Go into your downloads folder, select the folder and click extract (or extract all if it is the only file there)
- Choose a location to save these extracted files
- A progress bar should appear, indicating we have successfully began extracting the files needed for the virtual machine. Note, this can take up to 15 minutes
- Open up VMWare Workstation Player on your desktop
- Select the option for Open a VIrtual Machine
- Selecting this option should instantly take you to where you saved the file originally, but if not the file will be found in the location where you chose to save it earlier.
- Click on the ovffile folder, and select outputDemo
- This will give you the option to store the virtual machine. Name it and it should automatically provide a suitable storage path for your virtual machine. Press import
- It should now show “Importing <name of your virtual machine>”
- Once it has completed importing the virtual machine, you should be able to click “play virtual machine” which should successfully open up our virtual machine!
- Log into your virtual machine as a user called UbuntuDemo, with the password cellmodel
Running your first terminal commands
- Open up the terminal using Ctrl + alt + t on your keyboard
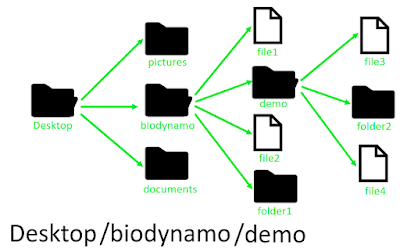
- cd into the biodynamo directoy
- Check that all the folders are there using the ls command
- cd into the build directory within the biodynamo directory
- Source the BioDynaMo environment by running source bin/thisbdm.sh (note that .sh files are executable, meaning entering them within the terminal will run something)

Running your first simulation using the terminal (pyramidal_cell)
- cd out of the build directory and back into the biodynamo cirectory using the cd .. command
- cd into the demo directory within the biodynamo directory, and then into the pyramidal_cell directory within the demo directory in one command using cd demo/pyramidal_cell
Note: this is the same as doing cd demo followed by cd pyramidal cell, just combined into one command
- Build the simulation by running bdm build
- Run the simulation by running bdm run
Note: we can run bdm build and bdm run because we sourced the biodynamo environment earlier
- Visualise the simulation by running the application paraview

Visualising in Paraview
- File > Load State
- Select Output
- Select the name of your current project
- Select the .pvsm file. Click okay
- A little cell should appear on the screen!
- Press the simulation play button
Running your second simulation (tumor_concept)
- cd out of pyramidal_cell
Note: you can cd one directory out back into demo using the cd .. command, or you can cd two directories out back into biodynamo using the cd ../.. Command
- cd into tumor_concept within the demo directory using either cd
demo and cd tumor_concept, or cd demo/tumor_concept
- Build the simulation using bdm build
- Run the simulation using bdm run
- Visualise the simulation using paraview
- Follow the previous steps for loading the image in paraview
Managing the tumor_concept visualisation on paraview
- Click on the MyCells section in the Pipeline Browser
- This will allow you to change the cell colour based on a chosen parameter. Select cell_colour_
- Select the ebst point of view to view the simulation from my dragging the image around
- PLay the simulation. It should look like this by the end of it
Creating your own simulation from scratch
- Create a new simulation by running bdm new <chosen name of simulation>
- Ignore setting a git username and email- you can type anything here for now!
- Congrats! You have just made your first simulation project directory!
- cd into your new project directory by running cd <name of simulation>
- Make a bdm.toml file in your project by running touch bdm.toml in our project directory. This will allow your simulation to be visualised by Paraview
- Open up the simulation in a pre-installed code editor by running code . . This allows us to write code to make our simulation do things!
- VSCode (the pre-isntalled code editor of choice for this virtual machine) will open up. Accept the permissions it is asking for
- Click the drop down button under src and open up the .h file (it will be the <nameofproject.h>. You should see the following code
- We are going to be writing some code within this line
- Insert the following code into this line (note that syntax here is very important
- Congrats! We have now made a cell with behaviours. Now open the bdm.toml file to write code that allows visualisation in Paraview
- The bdm.toml file should start empty
- Enter the following code, being careful to follow the correct syntax!
- File> save on both the .h and bdm.toml files
- Close VSCode and run Paraview exactly as before! You have now created your own simulation of a cell from scratch!

Comments
Post a Comment